现在我们看一下最终效果: 上部:

底部:

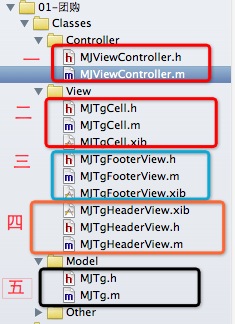
如上图中,可以使用表格UITableView, 顶部的图片轮换可以采用scrollView,加上一个定时器。中间部分,因为每一个cell的中子控件位置固定,大小固定。底部有一个加载更多的按钮。所以,我们可以对顶部图片轮换,中间固定部分,底部,加载更多部分,都使用xib文件 。顶部作为表格的头部,中间作为表格的每一个cell ,底部加载更多作为表格的底部部分。
一:代码结构如图:
代码部分解析:
二:代码部分:
1,ViewController.m文件:
1
2
3
4
5
6
7
8
9
10
11
12
13
14
15
16
17
18
19
20
21
22
23
24
25
26
27
28
29
30
31
32
33
34
35
36
37
38
39
40
41
42
43
44
45
46
47
48
49
50
51
52
53
54
55
56
57
58
59
60
61
62
63
64
65
66
67
68
69
70
71
72
73
74
75
76
77
78
79
80
81
82
83
84
85
86
87
88
89
90
91
92
93
94
95
96
97
98
99
100
101
102
103
104
105
106
107
108
109
110
111
112
113
114
115
116
117
118
119
120
121
122
123
124
125
126
127
128
129
130
131
132
133
134
135
136
137
138
139
140
141
142
143
144
145
146
147
148
149
150
151
152
153
154
155
156
157
158
159
| #import "MJViewController.h"
#import "MJTg.h"
#import "MJTgCell.h"
#import "MJTgFooterView.h"
#import "MJTgHeaderView.h"
@interface MJViewController () <UITableViewDataSource,MJTgFooterViewDelegate>
@property (weak, nonatomic) IBOutlet UITableView *tableView;
@property(nonatomic,strong) NSMutableArray *tgs;
@end
@implementation MJViewController
- (void)viewDidLoad
{
[super viewDidLoad];
//设置每一行的高度
self.tableView.rowHeight = 80;
MJTgFooterView *footerView = [MJTgFooterView tgFooterView];
footerView.delegate =self;
self.tableView.tableFooterView = footerView;
self.tableView.tableHeaderView = [MJTgHeaderView tgHeaderView];
}
#pragma mark - MJTgFooterViewDelegate的代理方法
/** 加载按钮的更多数据 */
-(void)tgFooterViewDidLoadBtnClick:(MJTgFooterView *)tgfooterView{
//加载更多的模型数据
int count = self.tgs.count;
NSArray *array = self.tgs;
for (int i=0; i<count; i++) {
MJTg *tg = array[i];
MJTg *tempTg = [[MJTg alloc] init];
tempTg.title = tg.title;
tempTg.icon =tg.icon;
tempTg.price = tg.price;
tempTg.buyCount = tg.buyCount;
[self.tgs addObject:tempTg];
}
//2,刷新表格,高数tableView重新加载模型数据,调用tableView的reloadData方法
[self.tableView reloadData];
}
-(NSMutableArray *)tgs{
if(_tgs == nil){
// 初始化
// 1. 获得plist的全路径
NSString *path = [[NSBundle mainBundle] pathForResource:@"tgs.plist" ofType:nil];
//2,健在数组
NSArray *dictArray = [NSArray arrayWithContentsOfFile:path];
//3,将dictArray里面的所有字典都转换成模型对象,放到新的数组中
NSMutableArray *tgArray = [NSMutableArray array];
for (NSDictionary *dict in dictArray) {
// 3.1 创建模型对象
MJTg *tg=[MJTg tgWithDict:dict];
// 3.2 添加模型对象到数组中
[tgArray addObject:tg];
}
//4,赋值
_tgs = tgArray;
}
return _tgs;
}
#pragma mark - 数据源方法
/** 一共有多少行数据 */
-(NSInteger)tableView:(UITableView *)tableView numberOfRowsInSection:(NSInteger)section{
return self.tgs.count;
}
/** 每一行显示怎么样的cell */
-(UITableViewCell *)tableView:(UITableView *)tableView cellForRowAtIndexPath:(NSIndexPath *)indexPath{
MJTgCell *cell =[MJTgCell cellWithTableView:tableView];
MJTg *tg = self.tgs[indexPath.row];
cell.tg =tg;
return cell;
}
@end
|
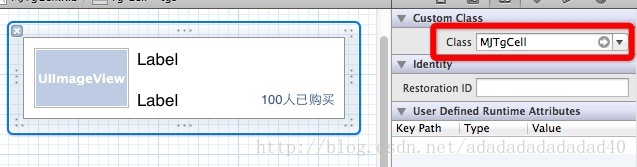
2,TgCell的xib文件和TgCell.h对应的部分,如图:
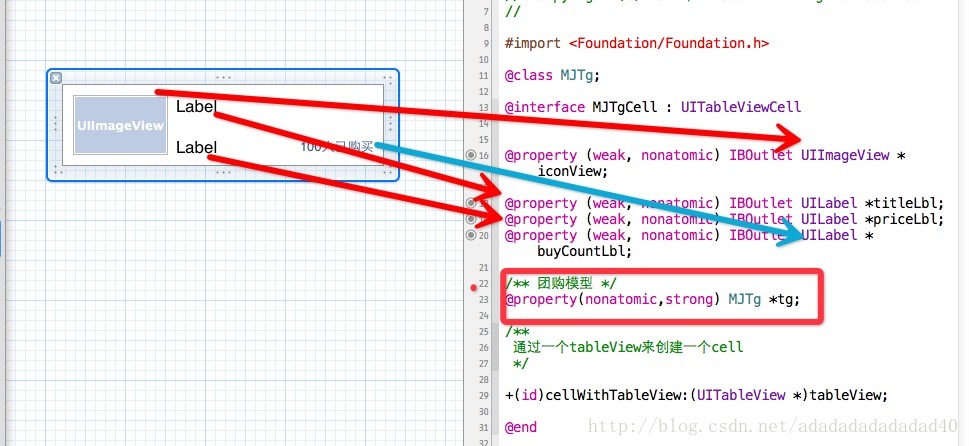
TgCell.h代码如下:
1
2
3
4
5
6
7
8
9
10
11
12
13
14
15
16
17
18
19
20
21
22
23
24
25
26
27
28
29
30
31
32
33
34
35
36
37
38
39
40
41
42
43
44
45
46
47
48
49
50
51
52
53
54
55
56
57
58
59
60
61
62
63
64
65
66
67
68
69
70
71
72
73
74
75
76
77
78
79
80
81
82
83
84
85
86
87
88
89
90
91
| #import <Foundation/Foundation.h>
@class MJTg;
@interface MJTgCell : UITableViewCell
@property (weak, nonatomic) IBOutlet UIImageView *iconView;
@property (weak, nonatomic) IBOutlet UILabel *titleLbl;
@property (weak, nonatomic) IBOutlet UILabel *priceLbl;
@property (weak, nonatomic) IBOutlet UILabel *buyCountLbl;
/** 团购模型 */
@property(nonatomic,strong) MJTg *tg;
/**
通过一个tableView来创建一个cell
*/
+(id)cellWithTableView:(UITableView *)tableView;
@end
TgCell.m文件如下:
#import "MJTgCell.h"
#import "MJTg.h"
@implementation MJTgCell
+(id)cellWithTableView:(UITableView *)tableView{
static NSString *flag= @"tgs";
MJTgCell *cell = [tableView dequeueReusableCellWithIdentifier:flag];
if(cell ==nil){
cell = [[NSBundle mainBundle] loadNibNamed:@"MJTgCell" owner:nil options:nil][0];
}
return cell;
}
-(void)setTg:(MJTg *)tg{
self.iconView.image = [UIImage imageNamed:tg.icon];
self.titleLbl.text = tg.title;
self.priceLbl.text = [NSString stringWithFormat:@"¥%@",tg.price];
self.buyCountLbl.text = [NSString stringWithFormat:@"%@人已购买",tg.buyCount];
}
@end
|
3,TgFooterView的xib文件和TgFooterView.h对象如下:
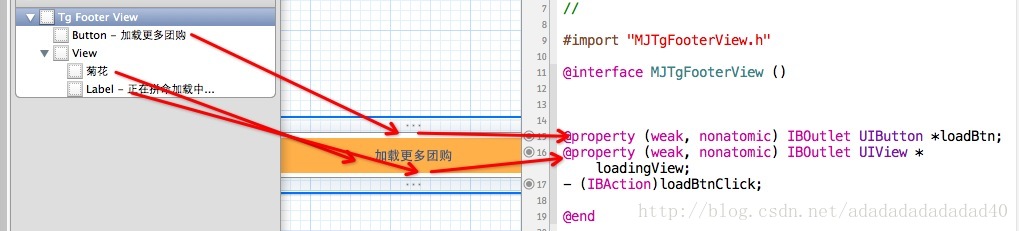
这儿需要注意一点:当点击加载更多按钮之后,将刷新按钮和正在拼命加载显示出来。所以,一开始的时候,将view隐藏,当点击按钮之后,再将按钮隐藏,view显示出来。
TgFooterView.h代码如下:
1
2
3
4
5
6
7
8
9
10
11
12
13
14
15
16
17
18
19
20
21
22
23
24
25
26
27
28
29
30
31
32
33
34
35
36
37
38
39
40
41
42
43
44
45
46
47
48
49
50
51
52
53
54
55
56
57
58
59
60
61
62
63
64
65
66
67
68
69
70
71
72
73
74
75
76
77
78
79
80
81
82
83
84
85
86
87
88
89
90
91
92
93
94
95
96
97
98
99
100
101
102
103
104
105
106
107
108
109
110
111
112
113
114
115
116
117
118
119
| #import <UIKit/UIKit.h>
@class MJTgFooterView;
@protocol MJTgFooterViewDelegate <NSObject>
@optional
-(void)tgFooterViewDidLoadBtnClick:(MJTgFooterView *)tgfooterView;
@end
@interface MJTgFooterView : UIView
@property(nonatomic,weak) id<MJTgFooterViewDelegate> delegate;
+(id)tgFooterView;
@end
TgFooterView.m文件代码:
#import "MJTgFooterView.h"
@interface MJTgFooterView ()
@property (weak, nonatomic) IBOutlet UIButton *loadBtn;
@property (weak, nonatomic) IBOutlet UIView *loadingView;
- (IBAction)loadBtnClick;
@end
@implementation MJTgFooterView
+(id)tgFooterView{
//创建Nib对象
// UINib *nib = [UINib nibWithNibName:@"MJTgFooterView" bundle:[NSBundle mainBundle]];
// return [[nib instantiateWithOwner:nil options:nil] lastObject];
return [[NSBundle mainBundle] loadNibNamed:@"MJTgFooterView" owner:nil options:nil][0];
}
- (IBAction)loadBtnClick {
//1,将加载按钮隐藏
self.loadBtn.hidden = YES;
//2,刷新按钮显示出来
self.loadingView.hidden = NO;
//3.0秒之后执行block中
dispatch_time_t popTime = dispatch_time(DISPATCH_TIME_NOW, (int64_t)(2.0 * NSEC_PER_SEC));
dispatch_after(popTime, dispatch_get_main_queue(), ^(void){
//3,通知代理,按钮被人点击了
if([self.delegate respondsToSelector:@selector(tgFooterViewDidLoadBtnClick:)]){
[self.delegate tgFooterViewDidLoadBtnClick:self];
}
//4,加载按钮显示,刷新按钮隐藏
self.loadBtn.hidden = NO;
self.loadingView.hidden = YES;
});
}
@end
|
3,TgHeaderView的xib和TgHeaderView属性对应部分:
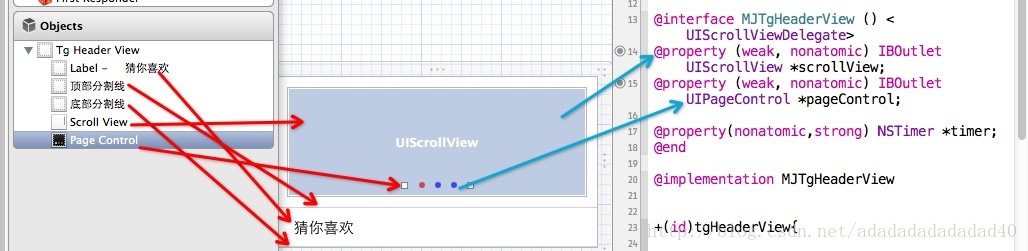
TgHeaderView.h文件的代码:
1
2
3
4
5
6
7
8
9
10
11
12
13
14
15
16
17
18
19
20
21
22
23
24
25
26
27
28
29
30
31
32
33
34
35
36
37
38
39
40
41
42
43
44
45
46
47
48
49
50
51
52
53
54
55
56
57
58
59
60
61
62
63
64
65
66
67
68
69
70
71
72
73
74
75
76
77
78
79
80
81
82
83
84
85
86
87
88
89
90
91
92
93
94
95
96
97
98
99
100
101
102
103
104
105
106
107
108
109
110
111
112
113
114
115
116
117
118
119
120
121
122
123
124
125
126
127
128
129
130
131
132
133
134
135
136
137
138
139
140
141
142
143
144
145
146
147
148
149
150
151
152
153
154
155
156
157
158
159
160
161
162
163
164
165
166
167
168
169
170
171
172
173
174
175
176
177
178
179
180
181
182
183
184
185
186
187
188
189
190
191
192
193
194
195
196
197
198
199
200
201
202
203
| #import <UIKit/UIKit.h>
@interface MJTgHeaderView : UIView
+(id)tgHeaderView;
@end
TgHeaderView.m文件代码:
#import "MJTgHeaderView.h"
#define MJImgCount 5
@interface MJTgHeaderView () <UIScrollViewDelegate>
@property (weak, nonatomic) IBOutlet UIScrollView *scrollView;
@property (weak, nonatomic) IBOutlet UIPageControl *pageControl;
@property(nonatomic,strong) NSTimer *timer;
@end
@implementation MJTgHeaderView
+(id)tgHeaderView{
return [[[NSBundle mainBundle] loadNibNamed:@"MJTgHeaderView" owner:nil options:nil] lastObject];
}
/** 当xib文件唤醒之后调用(就是xib文件上的空间加载完之后就会调用这个方法) */
-(void)awakeFromNib{
//1,设置scrollView的代理
self.scrollView.delegate = self;
//2,设置scrollView中的image中的参数
CGFloat imgViewY = 0;
CGFloat imgViewW = self.scrollView.frame.size.width;
CGFloat imgViewH = self.scrollView.frame.size.height;
for (int i=0; i<MJImgCount; i++) {
UIImageView *imgView = [[UIImageView alloc] init];
UIImage *img = [UIImage imageNamed:[NSString stringWithFormat:@"ad_0%i",i]];
imgView.image = img;
CGFloat imgViewX = i*imgViewW;
imgView.frame = CGRectMake(imgViewX, imgViewY, imgViewW, imgViewH);
//3,将image添加到scrollView中
[self.scrollView addSubview:imgView];
}
//4,设置scrollView的各项参数
//4.1,设置scrollView的滚动区域
self.scrollView.contentSize = CGSizeMake(imgViewW * MJImgCount, 0);
//4.2, 不显示横向滚动条
self.scrollView.showsHorizontalScrollIndicator = NO;
//4.3 分页
self.scrollView.pagingEnabled = YES;
//5,设置pageControl的总共页数
self.pageControl.numberOfPages = MJImgCount;
//6,添加定时器
[self addTimer];
}
/** 添加定时器 */
-(void)addTimer{
self.timer = [NSTimer timerWithTimeInterval:2.0 target:self selector:@selector(nextImg) userInfo:nil repeats:YES];
//消息循环(设置当前定时器的优先级比较)
[[NSRunLoop currentRunLoop] addTimer:self.timer forMode:NSRunLoopCommonModes];
}
-(void)nextImg{
//1,增加pageControl的页码
int currentIndex = self.pageControl.currentPage;
if(currentIndex == MJImgCount-1){
currentIndex = 0;
}else{
currentIndex += 1;
}
self.pageControl.currentPage = currentIndex;
//2,计算scrollView的滚动位置
CGPoint offset = CGPointMake(currentIndex * self.scrollView.frame.size.width, 0);
//3,有滚动效果
[self.scrollView setContentOffset:offset animated:YES];
}
#pragma mark - scrollView的代理方法
/** scrollView正在滚动 */
-(void)scrollViewDidScroll:(UIScrollView *)scrollView{
CGFloat offsetX = scrollView.contentOffset.x;
int index = (offsetX + scrollView.frame.size.width*0.5)/scrollView.frame.size.width;
self.pageControl.currentPage = index;
}
|
4,Tg模型部分:
Tg.h文件:
1
2
3
4
5
6
7
8
9
10
11
12
13
14
15
16
17
18
19
20
21
22
23
24
25
26
27
28
29
30
31
32
33
34
35
36
37
38
39
40
41
42
43
44
45
46
47
48
49
50
51
52
53
54
55
56
57
58
59
60
61
62
63
64
65
66
67
| #import <Foundation/Foundation.h>
@interface MJTg : NSObject
/** 标题 */
@property(nonatomic,copy) NSString *title;
/** 图标 */
@property(nonatomic,copy) NSString *icon;
/** 价格 */
@property(nonatomic,copy) NSString *price;
/** 购买人数 */
@property(nonatomic,copy) NSString *buyCount;
+(id)tgWithDict:(NSDictionary *)dict;
-(id)initWithDict:(NSDictionary *)dict;
@end
Tg.m文件代码如下:
#import "MJTg.h"
@implementation MJTg
+(id)tgWithDict:(NSDictionary *)dict{
return [[self alloc] initWithDict:dict];
}
-(id)initWithDict:(NSDictionary *)dict{
if(self==[super init]){
[self setValuesForKeysWithDictionary:dict];
}
return self;
}
@end
|
注意部分:
1,在TgCell.xib文件中,指定类为TgCell。
2,在创建TgCell对象时,要采用Cell的重用。
重用原理:在tableView滚动时,部分UITableViewCell会移出窗口,UITableView会将窗口外的UITableViewCell放入到一个对象池中,等待着重用,当UITableView要求datasource返回UITableViewCell时,datasource会先查看这个对象池,如果池中有未使用的UITableViewCell,datasource会使用新的数据配置这个UITableViewCell,然后返回给UITableView,重新显示到窗口中,从而避免创建新对象。
代码如下:
1
2
3
4
5
6
7
8
9
10
11
12
13
14
15
16
17
18
19
| +(id)cellWithTableView:(UITableView *)tableView{
static NSString *flag= @"tgs";
MJTgCell *cell = [tableView dequeueReusableCellWithIdentifier:flag];
if(cell ==nil){
cell = [[NSBundle mainBundle] loadNibNamed:@"MJTgCell" owner:nil options:nil][0];
}
return cell;
}
|
3,使用xib封装一个view的步骤:
1,新建一个xib文件描述一个view的内部结构(假设叫做TgCell.xib)
2, 新建一个自定义类(自定义类需要继承自系统自带的view,继承自哪个类,取决于xib根对象的class)
3, 新建的雷鸣最好跟xib文件名保持一致(比如类名就叫做TgCell)
4, 将xib中的空间和自定义类的.m文件进行连线
5, 提供一个类方法返回一个创建好的自定义view(屏蔽从xib加载的过程)
6, 提供一个模型属性让外界传递模型数据
7, 重写模型属性的setter方法,在这里将模型数据展示到对应的子控件上面