14-虚线和星星评分

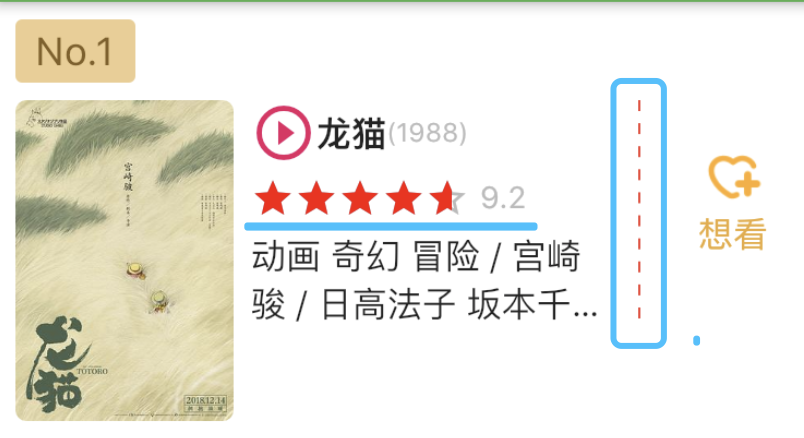
我们需要封装的组件效果:

图1

一,虚线的封装

1
2
3
4
5
6
7
8
9
10
11
12
13
14
15
16
17
18
19
20
21
22
23
24
25
26
27
28
29
30
31
32
33
34
import 'package:flutter/material.dart';

class HYDashedLine extends StatelessWidget {
final Axis axis;
final double dashedWidth;
final double dashedHeight;
final int count;
final Color color;

HYDashedLine({
this.axis = Axis.horizontal,
this.dashedWidth = 1,
this.dashedHeight = 1,
this.count = 10,
this.color = Colors.red
});

@override
Widget build(BuildContext context) {
return Flex(
direction: this.axis,
mainAxisAlignment: MainAxisAlignment.spaceBetween,
children: List.generate(this.count, (_){
return SizedBox(
width: this.dashedWidth,
height: this.dashedHeight,
child: DecoratedBox(
decoration:BoxDecoration(color: this.color),
),
);
}),
);
}
}

二, 星星评分的封装

1
2
3
4
5
6
7
8
9
10
11
12
13
14
15
16
17
18
19
20
21
22
23
24
25
26
27
28
29
30
31
32
33
34
35
36
37
38
39
40
41
42
43
44
45
46
47
48
49
50
51
52
53
54
55
56
57
58
59
60
61
62
63
64
65
66
67
68
69
70
71
72
73
74
75
76
77
78
79
80
81
82
83
84
85
86
87
88
89
90
91
92
93
94
95
96
97
98
99
100
101
import 'package:flutter/cupertino.dart';
import 'package:flutter/material.dart';

/**
* 星星评分
*/
class HYStarRating extends StatefulWidget {
final double rating; //当前分数
final double maxRating; //最大分数
final int count; //星星数量
final double size; //星星的大小
final Color unSelectedColor; //未选中的颜色
final Color selectedColor; //选中的颜色

final Widget unSelectedImage; //未选中的图片
final Widget selectedImage; //选中的图片

HYStarRating({
@required this.rating,
this.maxRating = 10,
this.count = 5,
this.size = 30,
this.unSelectedColor = const Color(0xffbbbbbb),
this.selectedColor = const Color(0xffff0000),
Widget unSelectedImage,
Widget selectedImage,
}):
this.unSelectedImage = unSelectedImage ?? Icon(Icons.star_border,size: size,color: unSelectedColor,),
this.selectedImage = selectedImage ?? Icon(Icons.star,size: size, color: selectedColor,);

@override
_HYStarRatingState createState() => _HYStarRatingState();
}

class _HYStarRatingState extends State<HYStarRating> {
@override
Widget build(BuildContext context) {
return Stack(
children: <Widget>[
Row(
mainAxisSize: MainAxisSize.min,
children: buildUnSelectedStar(),
),
Row(
mainAxisSize: MainAxisSize.min,
children: buildSelectedStar(),
),
],
);
}

//未选中的星星组件列表集合
List<Widget> buildUnSelectedStar(){
return List.generate(this.widget.count, (index){
return widget.unSelectedImage;
});
}

//选中的星星组件列表集合
List<Widget> buildSelectedStar(){
final star = widget.selectedImage;
//1. 创建stars
List<Widget> stars = [];

//2. 创建满填充的star
double oneValue = widget.maxRating / widget.count;
int entireCount = (widget.rating / oneValue).floor(); //floor(): 向下取整
for(int i = 0; i < entireCount; i++){
stars.add(star);
}

//3. 创建部分填充star
double leftWidth = ((widget.rating - oneValue * entireCount)/oneValue) * widget.size;

final halfStar = ClipRect(
clipper: HYStarClipper(leftWidth),
child: star,
);
stars.add(halfStar);

return stars;
}
}

class HYStarClipper extends CustomClipper<Rect> {
double width;

HYStarClipper(this.width);

@override
Rect getClip(Size size) {
return Rect.fromLTRB(0, 0, width, size.height);
}

//是否重新裁剪
@override
bool shouldReclip(HYStarClipper oldClipper) {
//宽度不一致,重新裁剪
return oldClipper.width != this.width;
}
}

Read More

13-Dart中的异步

一. Dart的异步模型

1.1. Dart是单线程的

1.1.1. 程序中的耗时操作

开发中的耗时操作:

  • 在开发中,我们经常会遇到一些耗时的操作需要完成,比如网络请求、文件读取等等;

  • 如果我们的主线程一直在等待这些耗时的操作完成,那么就会进行阻塞,无法响应其它事件,比如用户的点击;

Read More

12-滚动组件的使用

一:ListView组件的使用

1
2
3
4
5
6
7
8
9
10
11
12
13
14
15
16
17
18
19
20
21
22
23
24
25
26
27
28
29
30
31
32
33
34
35
36
37
38
39
40
41
42
43
44
45
46
47
48
49
50
51
52
53
54
55
56
57
58
59
60
61
62
63
64
65
66
67
68
69
70
71
72
73
74
75
76
77
78
79
80
81
82
83
84
85
86
87
88
89
90
91
92
93
94
95
96
import 'package:flutter/material.dart';

void main() {
runApp(MyApp());
}

class MyApp extends StatelessWidget {
@override
Widget build(BuildContext context) {
return MaterialApp(
debugShowCheckedModeBanner: false,
home: HYHomePage(),
);
}
}

class HYHomePage extends StatelessWidget {
@override
Widget build(BuildContext context) {
return Scaffold(
appBar: AppBar(
title: Text("富文本"),
),
body: HYContentBody(),
);
}
}

class HYContentBody extends StatelessWidget {
@override
Widget build(BuildContext context) {
return ListView.separated(
itemBuilder: (BuildContext ctx, int index){
return ListTile(
title: Text("联系人$index",style: TextStyle(backgroundColor: Colors.blue),),
);
},
separatorBuilder: (BuildContext ctx, int index){
return Divider(
color: Colors.red,
indent: 60, //前边的距离
endIndent: 100, //后边的距离
height: 5, //分割线所占的高度
thickness: 10, //分割线的厚度,即高度
);
},
itemCount: 100);
}
}


class HYContentBody3 extends StatelessWidget {
@override
Widget build(BuildContext context) {
return ListView.builder(
itemExtent: 80, //项的高度,或者宽度
// scrollDirection: Axis.horizontal,
// reverse: true, //列表数据反转
itemCount: 100,
itemBuilder: (BuildContext ctx, int index) {
return ListTile(
leading: Icon(Icons.people),
trailing: Icon(Icons.delete),
title: Text("联系人 $index"),
subtitle: Text("电话号码 18811112222"),
);
}
);
}
}


class HYContentBody2 extends StatelessWidget {
@override
Widget build(BuildContext context) {
return ListView(
children: List.generate(100, (index){
return Text("Hello world $index",style: TextStyle(fontSize: 30),);
}),
);
}
}


class HYContentBody1 extends StatelessWidget {
@override
Widget build(BuildContext context) {
return ListView(
children: <Widget>[
Text("hello world 1"),
Text("hello world 2"),
Text("hello world 3"),
],
);
}
}

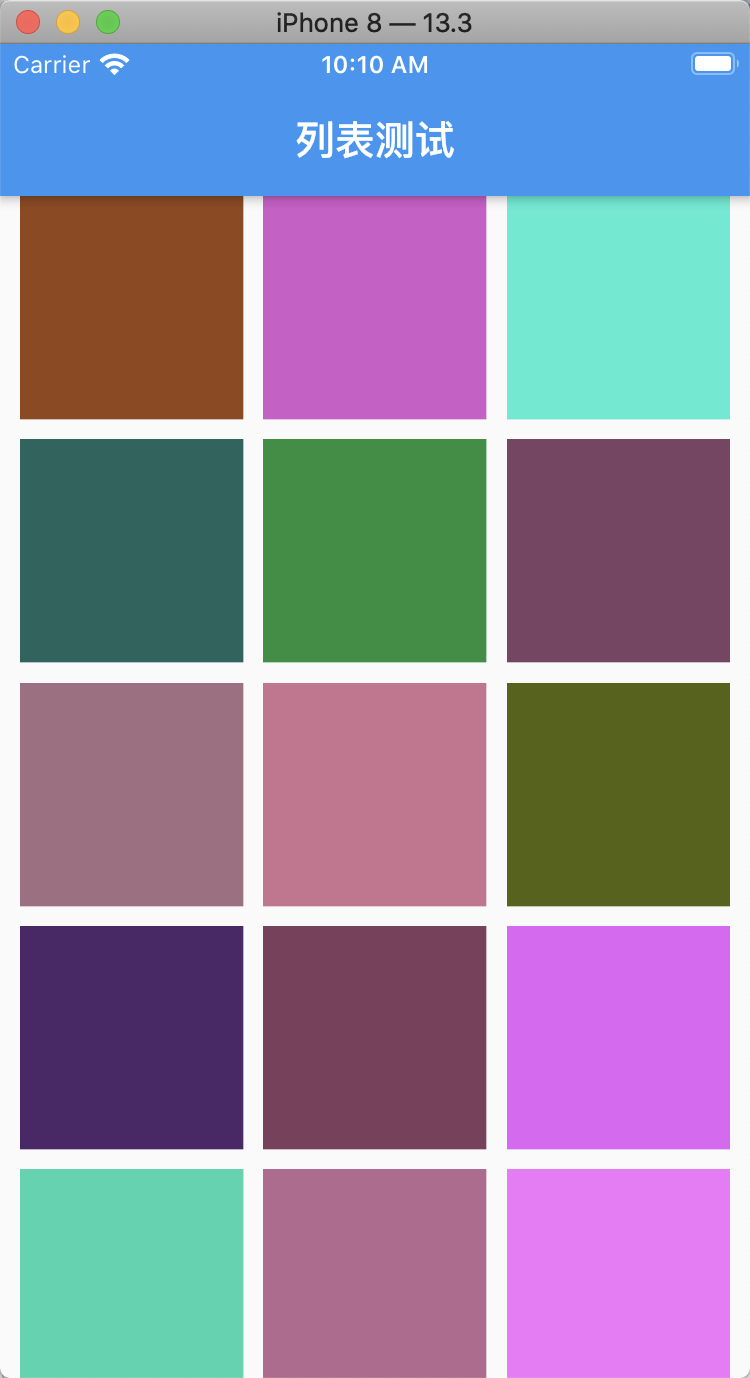
二:GridView的使用

效果图:

图1

实现代码:

Read More

11-基础组件的使用

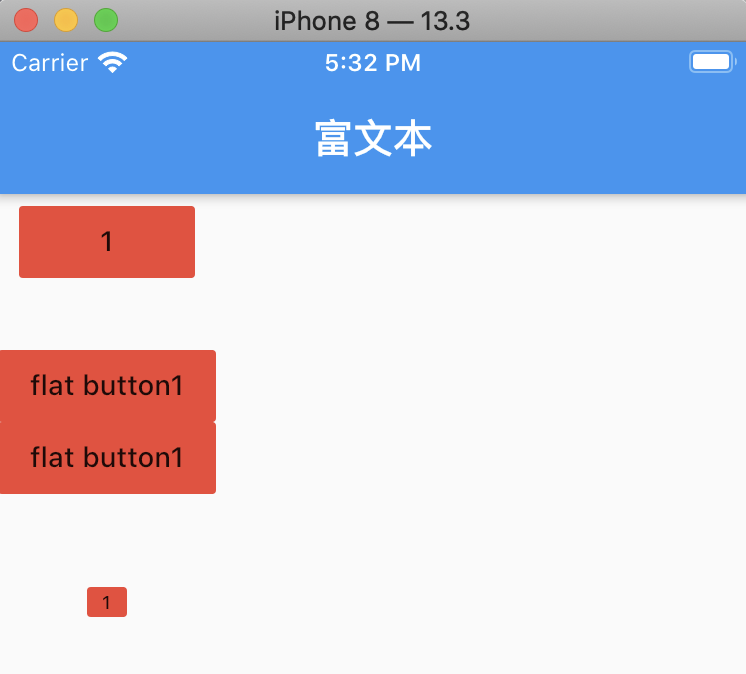
一:按钮设置

图1

代码:

1
2
3
4
5
6
7
8
9
10
11
12
13
14
15
16
17
18
19
20
21
22
23
24
25
26
27
28
29
30
31
32
33
34
35
36
37
38
39
40
41
42
43
44
45
46
47
48
49
50
51
52
53
54
class HYContentBody extends StatelessWidget {
@override
Widget build(BuildContext context) {
return Column(
children: <Widget>[
getDemo0(),
SizedBox(height:30),
getDemo1(),
SizedBox(height:30),
getDemo2()
],
);
}
}

Widget getDemo0(){
return FlatButton(
child: Text("1"),
color: Colors.red,
onPressed: () {},
);
}

Widget getDemo1(){
return Column(
children: <Widget>[
FlatButton(
materialTapTargetSize:MaterialTapTargetSize.shrinkWrap,
child: Text("flat button1"),
color: Colors.red,
onPressed: () {},
),
FlatButton(
materialTapTargetSize: MaterialTapTargetSize.shrinkWrap,
child: Text("flat button1"),
color: Colors.red,
onPressed: () {},
)
],
);
}

Widget getDemo2(){
return ButtonTheme(
minWidth: 20,
height: 15,
padding: EdgeInsets.all(0),
child: FlatButton(
color: Colors.red,
child: Text("1",style: TextStyle(fontSize: 9),),
onPressed: (){},
),
);
}

二:给图片增加占位图

图1

Read More

10-图文混排,按钮,图片

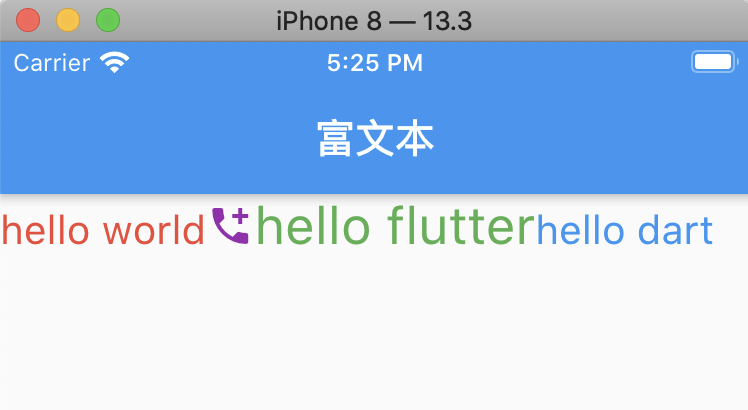
一:图文混排效果:

图1

代码:

1
2
3
4
5
6
7
8
9
10
11
12
13
14
15
class HYContentBody extends StatelessWidget{
@override
Widget build(BuildContext context) {
return Text.rich(
TextSpan(
children: [
TextSpan(text:"hello world",style: TextStyle(color: Colors.red, fontSize: 20)),
WidgetSpan(child: Icon(Icons.add_call,color: Colors.purple,)),
TextSpan(text:"hello flutter",style: TextStyle(color: Colors.green,fontSize: 26)),
TextSpan(text:"hello dart", style: TextStyle(color: Colors.blue,fontSize: 20))
],
),
);
}
}

二,按钮使用的效果

图1

Read More

08-按钮变小设置

1,通过上边的了解,我们发现,按钮是有外边距的

图1

当前实现的代码:

1
2
3
4
5
6
7
8
9
10
11
12
13
14
15
16
Widget getDemo1(){
return Column(
children: <Widget>[
FlatButton(
child: Text("flat button1"),
color: Colors.red,
onPressed: () {},
),
FlatButton(
child: Text("flat button1"),
color: Colors.red,
onPressed: () {},
)
],
);
}

解决办法:添加属性设置:

Read More

07-Flutter的基础Widget

一. 文本Widget

在Android中,我们使用TextView,iOS中我们使用UILabel来显示文本;

Flutter中,我们使用Text组件控制文本如何展示;

1.1. 普通文本展示

在Flutter中,我们可以将文本的控制显示分成两类:

  • 控制文本布局的参数: 如文本对齐方式 textAlign、文本排版方向 textDirection,文本显示最大行数 maxLines、文本截断规则 overflow 等等,这些都是构造函数中的参数;
Read More

06-Dart(二)

一. 运算符

这里,我只列出来相对其他语言比较特殊的运算符,因为某些运算符太简单了,不浪费时间,比如+、-、+=、==。

你可能会疑惑,Dart为什么要搞出这么多特殊的运算符呢?

你要坚信一点:所有这些特殊的运算符都是为了让我们在开发中可以更加方便的操作,而不是让我们的编码变得更加复杂。

1.1. 除法、整除、取模运算

我们来看一下除法、整除、取模运算

图1

Read More

05-Dart(一)

一. Dart介绍和安装

1.1. 认识Dart

Google为Flutter选择了Dart就已经是既定的事实,无论你多么想用你熟悉的语言,比如JavaScript、Java、Swift、C++等来开发Flutter,至少目前都是不可以的。

在讲解Dart的过程中,我会假定你已经有一定的编程语言基础,比如JavaScript、Java、Python、C++等。

其实如果你对编程语言足够的自信,Dart的学习过程甚至可以直接忽略:

  • 因为你学过N种编程语言之后,你会发现他们的差异是并不大;
Read More